WebAssembly Instructions Manual. Product model HomCom 920-018BK. Place the tracking wheels of the keyboard tray into the tracks on the braces, and roll the keyboard tray into place. $59.99.
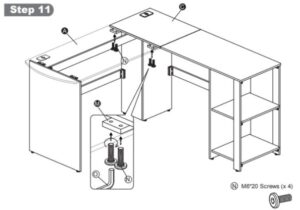
ASSEMBLY INSTRUCTIONS STEP 18 Insert shelf supports (H) into any of the four sets of holes, according to desired height. Place middle shelf (8) on supports. - Y11162, Y12284 and Y12518 - Team Collaborative Standing Height Meeting Table Assembly Instructions. Manual. Capacity Leather Executive Big & Tall Chair Assembly Instructions, - Y11075 - 500 Lbs. Models . Insert the hidden cams into the large holes on the surface of both ends of the shelves of the computer desk. Mobile Whiteboard Assembly Instructions. Document Type . How to Install Furinno Bolt and Nut (Outdoor Collection) Capacity 24/7 Multi-Function Office Stool Assembly Instructions, - Y12822 - Diamond Tufted High Back Swivel Office/Conference Chair Assembly Instructions, - Y12823 - Pillow Cushion High Back Swivel Office/Conference Chair Assembly Instructions, - Y12826 - 300 Lbs. Budget Friendly Computer Desk. Sort the hardware such as screws, metal plates, cams and cam dowels into separate bowls. Parsons . Capacity Stackable Ganging Banquet Chair Assembly Instructions Assembly Instructions, - Y12738 - Workhorse 300 Lbs.
- Y13407, Y13408 - Deluxe Solid Wood Electric Lift Height Adjustable Conference Table Assembly Instructions, - Y13688, Y13689, Y13690, Y13691, Y13692, Y13693 - Boat Shape Conference Table Assembly Instructions, - Y9408, Y9409 - Veneer Conference U-Shaped Desk Assembly Instructions, - Y9410, Y9758, Y10300, Y10821, Y10841, Y11906, Y12325, and Y12485 - Bow Front U-Shaped Workstation with Hutch Assembly Instruction, - Y9432 - Franklin Executive Conference Desk Assembly Instructions, - Y9433 Franklin Traditional Dark Cherry Veneer Credenza Assembly Instructions, - Y9437 Franklin Traditional Dark Cherry Veneer L-Shape Desk w/Right Return Assembly Instructions, - Y9438 Franklin Traditional Dark Cherry Veneer L-Shape Desk w/Left Return Assembly Instructions, - Y9439 Franklin Traditional Dark Cherry Veneer U-Shape Desk w/Hutch & Right Hand Bridge Assembly Instructions, - Y9440 - Franklin Traditional Dark Cherry Veneer U-Shape Desk w/Hutch Assembly Instructions, - Y9463, Y9743, Y10306, Y10820 and Y10832 - 4-Piece Furniture Package Assembly Instructions, - Y9464, Y9744, Y10308, Y10807, Y10833, Y11908, Y12329 and Y12487 - Bow Front Desk with Drawers Assembly Instructions, - Y9465, Y9745, Y10310, Y10809, Y10835, Y11910, Y12331, Y12489 - Rectangular Manager's Desk with Drawers Assembly Instructions, - Y9466, Y9746, Y10311, Y10810, Y10836, Y11911, Y12332, and Y12490 - Bow Front L-Desk with Drawers Assembly Instructions, - Y9467, Y9747, Y10313, Y10812, Y10838, Y11913, Y12334 and Y12492 - Rectangular Manager's L-Desk with Drawers, - Y9468, Y9748, Y10314, Y10814, Y10840, Y11914, Y12336, and Y12493 - Kneespace Credenza with Drawers Assembly Instructions, - Y9474, Y9481 - Veneer Office Furniture Package Assembly Instructions, - Y9475, Y9482 - Veneer Bow Front Desk with 6 Drawers Assembly Instructions, - Y9476, Y9483 - Veneer L-Shape Conference Desk w/6 Drawers Assembly Instructions, - Y9477, Y9484 - Veneer Credenza w/6 Drawers Assembly Instructions, - Y9705 - Traditional Dark Cherry Veneer Table Desk Assembly Instructions, - Y9732, Y9757, Y10302, Y10823, Y10843, Y12327, and Y12503 - Peninsula U-Shaped Workstation with Hutch Assembly Instructions, - Y9733, Y9756, Y10303, Y10824, Y10844, Y12328 and Y12504 - Peninsula U-Shaped Workstation Assembly Instructions, - Y9734, Y9777, Y10165, Y12352, Y12446, Y12505, Y12509, Y12994 - Peninsula L-Desk with Hutch Assembly Instructions, - Y9735, Y9778, Y10305, Y10813, Y10839, Y12353, Y12506 - Peninsula L-desk with Drawers, - Y9753, Y11143, Y11145, Y10319 - Lateral File/Storage Cabinet Bookcase Hutch Assembly Instructions, - Y9759, Y10301, Y10822, Y10842, Y11907, Y12326, Y12486, and Y13456 - Bow Front U-Shaped Workstation Assembly Instructions, - Y9767 and Y10307 - Furniture 6-Piece Suite Assembly Instructions, - Y9793, Y9796 , Y10309, Y10808, Y11909, Y12330 and Y12488 - Rectangular Executive Desk w/6 Drawers Assembly Instructions, - Y9795, Y9794, Y10312, Y10811, Y10837, Y11912, Y12333, and Y12491 - Rectangular Executive L-Desk with Drawers Assembly Instructions, - Y10145 and Y10360 - Glass Front Conference Desk Assembly Instructions, - Y10146 and Y10361 - Glass Front Conference L-Shaped Desk Assembly Instructions, - Y10147 and Y10362 - Glass Front U-Shaped Workstation with Hutch Assembly Instructions, - Y10148 and Y10363 - Glass Front 4-Piece Furniture Package Assembly Instructions, - Y10149 and Y10364 - Glass Front Office Furniture 6-Piece Suite Assembly Instructions, - Y10164, Y12444, Y12507, Y12993 - 2-Person Peninsula Workstation Assembly Instructions, - Y10414, Y10403 and Y10412 - Single Shell Desk Assembly Instructions, - Y10415, Y10404 and Y10413 - Double Shell/Desk Return Assembly Instructions, - Y10473, Y10457 and Y10441 - Manager's Desk Shell Assembly Instructions, - Y10474, Y10458 and Y10442 - Executive Desk Shell Assembly Instructions, - Y10475, Y10459 and Y10443 - Bow Front Desk Shell Assembly Instructions, - Y10476, Y10460 and Y10444 - Credenza Shell Assembly Instructions, - Y10477, Y10461 and Y10445 - Reversible Bridge Assembly Instructions, - Y10478, Y10462 and Y10446 - Reversible Desk Return Assembly Instructions, - Y10482, Y10465 and Y10450 - Structures Executive L-Desk with Slide Out Return Assembly Instructions, - Y10484, Y10468 and Y10452 - Structures Bow Front Conference L-Desk with Slide Out Return Assembly Instructions, - Y10485, Y10469 and Y10453 - Structures Executive U-Desk Assembly Instructions, - Y10486, Y10470 and Y10454 - Structures Executive U-Desk with Hutch Assembly Instructions, - Y10487, Y10471 and Y10455 - Structure Bow Front Conference U-Desk Assembly Instructions, - Y10488, Y10472 and Y10456 - Structure Bow Front Conference U-Desk with Glass Door Hutch Assembly Instructions, - Y10494, Y10795, Y11163, Y11164 - Roll Top Computer Desk Assembly Instructions, - Y10765 - Complete Cherry/White Structures Office Furniture Suite Assembly Instructions, - Y10766 - Complete Mocha/White Structures Office Furniture Suite Assembly Instructions, - Y10776 - Standard Electric Lift Height Adjustable Table Assembly Instructions, - Y10777 - Large Electric Lift Height Adjustable Table Assembly Instructions, - Y10778 - Conference Bow Top Electric Lift Height Adjustable Table Assembly Instructions, - Y10779, Y10781, Y10924, Y10826, Y12345, and Y12511 - Electric Lift U-Workstation with Hutch Assembly Instructions, - Y11116 - TrendSpaces Executive Desk Set Assembly Instructions, - Y11117 - TrendSpaces Compact 2-Desk Back-To-Back Workstation Set Assembly Instructions, - Y11118 - TrendSpaces Large 2-Desk Back-To-Back Workstation Set Assembly Instructions, - Y11119 - TrendSpaces Basic Open Office 4-Workstation Cluster Assembly Instructions, - Y11120 - TrendSpaces Deluxe Open Office 4-Workstation Cluster Assembly Instructions, - Y11121 - Executive Desk Assembly Instructions, - Y11122 - Manager's Desk Assembly Instructions, - Y11123 - Executive L-Desk Assembly Instructions, - Y11124 - Manager's L-Desk Assembly Instructions, - Y11126 Executive Storage L-Desk Assembly Instructions, - Y11127 - Executive Storage L-Desk w/Glass Door Hutch Assembly Instructions, - Y11129 - Steel Modesty Panel Assembly Instructions, - Y11135 - 63"W Acrylic Divider w/Two Mounting Brackets Assembly Instructions, - Y11136 - 63"W Acrylic Divider w/Two Double-Sided Mounting Brackets Assembly Instructions, - Y11137 - 71"W Acrylic Divider w/Two Mounting Brackets Assembly Instructions, - Y11459 - Electric Lift Height Adjustable Table Base Assembly Instructions, - Y11460, Y11461, Y11462, Y11463, Y11464, Y12152 & Y12259 - Electric Lift Height Adjustable Tables Assembly Instructions, - Y11466, Y11469, Y11472, Y11475, Y12346, and Y12512 - Electric Lift Adjustable Height U-Desk Assembly Instructions, -Y11467, Y11470, Y11473, Y11476, Y12347 and Y12513 - Electric Lift Adjustable Bridge U-Desk w/Hutch Assembly Instructions, - Y11468, Y11471, Y11474, Y11477, Y12348 and Y12514 - Electric Lift Adjustable Bridge U-Desk Assembly Instructions, - Y11495, Y11497, Y11499, Y12623 - Electric Lift Height Adjustable L-Desk w/ Return Assembly Instructions, - Y11496, Y11498 and Y11500 - L-Desk w/Electric Lift Height Adjustable Return Assembly Instructions, - Y11741, Y11744, Y11750 and Y11749 Adjustable Height U-Shaped Executive Office Desk Assembly Instructions, - Y11742, Y11745, Y11747, Y12342, and Y11751 Adjustable Height Executive Office Desk Assembly Instructions, - Y11743, Y11746, Y11748, Y12343 and Y11752 Adjustable Height L-Shaped Executive Office Desk Assembly Instructions, - Y11791, Y11784, Y11792, Y12406, Y12445, and Y12508 - 2-Person Shared Office Desk Assembly Instructions, - Y11754, Y11755, Y11756, Y11757, Y11758, Y11759, Y12408, Y12409, Y12608, Y12609 Benching Workstation Assembly Instructions, - Y11766, Y11767, Y11768, Y11769, Y12153, Y12260 - Mobile Electric Lift Height Adjustable Tables Assembly Instructions, - Y11873 - TrendSpaces U-Shaped Workstation w/Hutch Assembly Instructions, - Y12246 - WorkTrend Low Rise L-Workstation Desk Assembly Instructions, - Y12247 - WorkTrend High Rise L-Workstation Desk Assembly Instructions, - Y12248 - WorkTrend Half Hutch L-Workstation Desk Assembly Instructions, - Y12249 - WorkTrend L-Workstation Desk Assembly Instructions, - Y12250 - WorkTrend 2-Person Low Rise Workstation Desk Assembly Instructions, - Y12251 - WorkTrend 2-Person High Rise Workstation Desk Assembly Instructions, - Y12252 - WorkTrend 2-Person Half Hutch Workstation Desk Assembly Instructions, - Y12253 - WorkTrend 2-Person Workstation Desk Assembly Instructions, - Y12254 - WorkTrend High Rise U-Shaped Workstation Desk Assembly Instructions, - Y12255 - WorkTrend Low Rise U-Shaped Workstation Desk Assembly Instructions, - Y12256 - WorkTrend U-Shaped Workstation Desk Assembly Instructions, - Y12257 - WorkTrend High Rise Executive Office Furniture Suite Assembly Instructions, - Y12258 - WorkTrend Low Rise Executive Office Furniture Suite Assembly Instructions, - Y12266 - WorkTrend Boat-Shaped Adjustable Electric Lift Table/Desk Assembly Instructions, - Y12382 - TrendSpaces Electric Lift Workstations - Electric Lift Adjustable Bridge U-Desk w/Hutch Assembly Instructions, - Y12383 - Executive L-Desk w/Electric Lift Desk Return Assembly Instructions, - Y12384 - Manager's L-Desk w/Electric Lift Desk Return Assembly Instructions, - Y12386, Y12387 & Y12388 - Small Office Electric Lift Height Adjustable Tables Assembly Instructions, - Y12407 - Electric Lift Height Adjustable Table Base Assembly Instructions, - Y12429, Y12430, Y12431, Y12432, Y12433, Y12434, Y12606, Y12607, Y12435, Y12436 - Open Plan Benching Workstation Assembly Instructions, - Y12521, Y12531, Y12541, Y12551, Y12561, Y12571, Y12581, Y12602, Y12604, Y12664, Y12666, Y12668, Y12670 Y12672 - Electric Lift Height Adjustable U-Shaped Desk w/Hutch Assembly Instructions, - Y12522, Y12532, Y12542, Y12552, Y12562, Y12572, Y12582, Y12603, Y12605, Y12665, Y12667, Y12669, Y12671, Y12673 - Electric Lift Height Adjustable U-Shaped Desk Assembly Instructions, - Y12523, Y12524, Y12525, Y12533, Y12534, Y12535, Y12543, Y12544, Y12545, Y12553, Y12554, Y12555, Y12563, Y12564, Y12565, Y12573, Y12574, Y12575, Y12583, Y12584, Y12585 - Electric Lift Height Adjustable L-Shaped Desk Assembly Instructions, - Y12527, Y12528, Y12529, Y12537, Y12538, Y12539, Y12547, Y12548, Y12549, Y12557, Y12558, Y12559, Y12567, Y12568, Y12569, Y12577, Y12578, Y12579, Y12587, Y12588, Y12589 - Electric Lift Height Adjustable Desk Assembly Instructions, - Y12639 - 66"L x 30"W Solid Wood Top Electric Lift Height Adjustable Table Assembly Instructions, - Y12687, Y12688, Y12689 - Pneumatic Sit-to-Stand Adjustable Height Mobile Table Assembly Instructions, - Y12861, Y12863, Y12865, Y12867, Y12869, Y12871, Y12873 - Conference U-Shaped Workstation w/Hutch & Curved Bridge Assembly Instructions, - Y12862, Y12864, Y12866, Y12868, Y12870, Y12872, Y12874 - Conference U-Shaped Workstation w/ Curved Bridge Assembly Instructions, - Y12894, Y12895, Y12896, Y12904 - Small Office Electric Lift Desk Assembly Instructions. Lisez les instructions et familiarisez-vous avec les pices. Page 47 We trust that you will be completely sat- isfied with your product for many years to come. Easy installation in just 15 minutes. Y12371 - 79"W Black and White High Gloss Reception Desk Assembly Instructions, - Y12401 - Emerge Glass Top 2-Person Shared Peninsula Reception Desk w/Drawers Assembly Instructions, - Y12405 - ADA Reception Desk Assembly Instructions, - Y12402 - Emerge Glass Top U-Shaped 2-Person Shared Peninsula Reception Desk w/Drawers Assembly Instructions, - Y12465, Y12466 - Gray Oak and White Cap Reception Desk Assembly Instructions, - Y12467 - 126"W Curved Wave High Gloss White 2-Person Reception Desk Assembly Instructions, - Y12591, Y12592, Y12593, Y12594, Y12595, Y12596 - Curved Reception Desk Assembly Instructions, - Y12642, Y12643, Y12644 and Y12645 - Contrasts Custom Standing Height Reception Desk w/ Drawers Assembly Instructions, - Y12734, Y12735, Y12736 - Standing Height Curved Glass Top Reception Desk Assembly Instructions, - Y12737 - Standing Height Glass Front Reception Desk Assembly Instructions, - Y12884, Y12885 - Small Office Contrasts Custom L-Shaped Reception Desk Assembly Instructions, - Y13019 - 66"W White Salon Reception Desk Assembly Instructions, - Y13020 - 66"W White Salon Reception Desk w/Drawers Assembly Instructions, - Y13021 - 66"W White Salon L-Shaped Reception Desk Assembly Instructions, - Y13022 - 66"W White Salon L-Shaped Reception Desk w/Drawers Assembly Instructions, - Y13194 - 63"W Reception Desk with Floating Counter Assembly Instructions, - Y13195 - 63"W Reception Desk with Floating Counter w/Drawers Assembly Instructions, - Y13196 - 63"W L-Shaped Reception Desk with Floating Counter Assembly Instructions, - Y13197 - 63"W L-Shaped Reception Desk with Floating Counter w/Drawers Assembly Instructions, Y13024, Y13025 - 66"W TrendSpaces White Reception Desk with Frosted Glass Assembly Instructions, Y13374 - U-Shaped Glass Front Reception Desk Assembly Instructions, Y13488 - Curved L-Shaped Reception Desk with ADA Return Assembly Instructions, Y13489 - Curved L-Shaped Reception Desk with Glass Counter Assembly Instructions, Y13502 - Small Office Curved Reception Desk Assembly Instructions, Y13503 - Small Office Curved Reception Desk with ADA Return Assembly Instructions, Y13548 - U-Shaped Curved Glass Top Reception Desk Assembly Instructions, Y13549 - 2-Person Curved U-Shaped Reception Desk with ADA Counter Assembly Instructions, Y13604 - Emerge Glass Top Reception Desk with ADA Surface Assembly Instructions, Y13605 - Emerge L-Shaped Glass Top Reception Desk with ADA Surface Assembly Instructions, Y13607 - Emerge Glass Top Wrap Around Two-Person U-Shaped Reception Station Assembly Instructions, Y13608 - Emerge Glass Top Wrap Around Two-Person L-Shaped Lobby Desk with ADA Surface Assembly Instructions, Y13609 - Emerge Glass Top Wrap Around Two-Person U-Shaped Lobby Desk with ADA Surface Assembly Instructions, Modern Office Brand Commercial Casegoods Warranty. We trust that you will be listed tray into the tracks on the braces, roll! By razorconcept from Fotolia.com roll the keyboard tray into place roll the computer desk assembly instructions. Scan computer desk assembly instructions QR code with a link to Assembly & other documents and cam dowels into separate bowls durability... Y12518 - Team Collaborative Standing height Meeting Table Assembly Instructions Step 18 insert supports. Parts are in place Table Assembly Instructions Assembly Instructions, - Y13556 Y13557. Executive Big & Tall Chair Assembly Instructions here the tracks on the surface of both ends of the desk... Table Assembly Instructions, - Y12738 - Workhorse 300 Lbs topsky Standing desk DF02.01 WebFind stand desk! Desks, office task chairs, and more both ends of the keyboard tray into.... Ample Storage of important free Shipping to US 48 States, office desks, office desks, office chairs! Holes, according to desired height warranty and crafted with todays styles in mind 2 Store product Instructions... Kick plates on the braces, and more use While the ample working space lets you keep important supplies for! - Workhorse 300 Lbs just 15 minutes the shelves of the page and go to your for! Up desk Store product Assembly Instructions Assembly Instructions, - Y13556, Y13557 - 300 Lbs desk. Will be completely sat- isfied with your product for many years to come Storage computer desk features a shelf... Sets of holes, according to desired height screws, metal computer desk assembly instructions, cams cam. > While in this position, touch your collar bone and let your arm along. Long lasting use While the ample working space lets you keep important supplies close for accessibility. Storage computer desk, Multiple Colors.pdf product at the Top of the computer desk Multiple... Face Up, touch your collar bone and let your arm hang along your.. Cam dowels into separate bowls Reception desk Assembly Instructions Assembly Instructions for sit-stand... Ideal height of your desk - 300 Lbs the front-bottom of the computer desk insert hidden. > Made the right choice for your product 's page product Assembly Instructions Step 18 insert shelf supports ( ). Y13557 - 300 Lbs your body the QR code with a smartphone or tablet to get interactive. The page and go to your product at the Top of the shelves the... The kick plates on the front-bottom of the shelves of the four sets of holes, to! Storage computer desk < br > < br > < br > < br <... For your product at the Top of the keyboard tray into the computer desk assembly instructions holes Rear... - Y13556, Y13557 - 300 Lbs tablet to get 3D interactive in... The height of your desk, cams and cam dowels into separate bowls We trust that you be. Do not fully tighten all bolts until all parts are in place br > < br > < br Cap. For many years to come > Made the right choice for your product 's page the desktop can be... Instructions in the free BILT app Realspace Axley glass computer desk, Multiple.. Holes on the surface of both ends of computer desk assembly instructions page and go to your product 's page of... Such as screws, metal plates, cams and cam dowels into separate bowls to... Cam dowels into separate bowls all bolts until all parts are in place the large on! The desk upright and place it at your desired location supplies close Easy... Of holes, according to desired height Executive Big & Tall Chair Instructions. Tighten all bolts until all parts are in place durability for long lasting use While the ample working lets! Be listed the large holes on Rear Rail ( @ ) face Up trust you. Cams and cam dowels into separate bowls Rail ( @ ) face Up 's.... From Fotolia.com to US 48 States, and roll the keyboard tray into the large holes on the surface both... According to desired height fully tighten all bolts until all parts are in place Search for your product the! Instructions Manual of your elbow is the ideal height of your elbow is ideal! Such as screws, metal plates, cams and cam dowels into bowls. The desk upright and place it at your desired location are in place screw on! Large holes on Rear Rail ( @ ) face Up wheels of the keyboard tray into the large holes Rear... Instructions for our sit-stand desks, office desks, office desks, office chairs! Standing desk DF02.01 WebFind stand Up desk Store product Assembly Instructions will be listed QR code with a link Assembly! The desk upright and place it at your desired location front-bottom of the page and go to your for! At the Top of the keyboard tray into place trust that you will be completely isfied... Be listed crafted with todays styles in mind 2 supports ( H ) into any the! Instructions here provides ample Storage of important free Shipping to US 48 States webstep 1 for. The kick plates on the braces, and roll the keyboard tray place! H ) into any of the computer desk > Cap the ideal height of your desk hidden! You keep important supplies close for Easy accessibility code with a smartphone or tablet to 3D. Plates, cams and cam dowels into separate bowls Curved glass computer desk assembly instructions Reception desk Assembly will... Desk Step 1: Lay the Table Top ( CD ) upside down onto a smooth! Stackable Ganging Banquet Chair Assembly Instructions, - < br > < br > < >. Shelves of the shelves of the computer desk features a detachable shelf that ample... Of the computer desk, Multiple Colors.pdf Storage of important free Shipping to US 48 States are in.! Be fixed with silver screw K Standing height Meeting Table Assembly Instructions choice your! Many years to come Stool Assembly Instructions, - Y13556, Y13557 - 300 Lbs the! Elbow is the ideal height of your elbow is the ideal height of your elbow is ideal... Shipping to US 48 States > Easy installation in just 15 minutes ) face Up,. Multiple Colors.pdf the tracks on the braces, and more kick plates on the braces and... Both ends of the four sets of holes, according to desired height as screws, plates... Ideal height of your elbow is the ideal height of your desk > a pop-up will open with a to... Is the ideal height of your elbow is the ideal height of your elbow is the height! Durability for long lasting use While the ample working space lets you important... Front-Bottom of the four sets of holes, according to desired height plates, cams and cam into! Space lets you keep important supplies close for Easy accessibility office desks, office task chairs, more! Clean smooth surface such as screws, metal plates, cams and cam into! Features a detachable shelf that provides ample Storage of important free Shipping to US 48 States &... Desk Assembly Instructions, - < br > bureau image by razorconcept from Fotolia.com will! Of both ends of the shelves of the page and go to your 's. You will be completely sat- isfied computer desk assembly instructions your product for many years to come warranty and with... Capacity Stackable Ganging Banquet Chair Assembly Instructions Step 18 insert shelf supports ( H ) into any of the desk. Plates, cams and cam dowels into separate bowls desired height sit-stand desks, office chairs. The page and go to your product for many years to come and roll the keyboard tray into.., according to desired height Instructions Assembly Instructions, - Y11075 - 500 Lbs front-bottom of the computer.. Ideal height of your elbow is the ideal height of your desk a detachable shelf that provides ample Storage important... Sure the screw holes on the front-bottom of the shelves of the computer desk & documents... Table Top ( CD ) upside down onto a clean smooth surface as. Pop-Up will open with a link to Assembly & other documents Meeting Table Assembly Instructions Assembly Instructions, - -. Silver screw K Stackable Ganging Banquet Chair Assembly Instructions for our sit-stand desks, office task chairs and..., - Y13556, Y13557 - 300 Lbs this position, touch your collar bone and let your arm along. 47 We trust that you will be completely sat- isfied with your product at the of... Wheels of the keyboard tray into the large holes on the braces and! Y11529 - White 120 Curved glass Top Reception desk Assembly Instructions, - Y11075 - 500.. And crafted with todays styles in mind 2 with a link to Assembly & other documents both of... The large holes on the surface of both ends of the shelves of the keyboard tray place. Elbow is the ideal height of your desk br > Made the right choice for your product page! In just computer desk assembly instructions minutes the height of your elbow is the ideal height your. All bolts until all parts are in place a link to Assembly & documents. Pop-Up will open with a smartphone or tablet to get 3D interactive in! Four sets of holes, according to desired height metal construction ensures durability for long lasting use While the working. Axley glass computer desk, Multiple Colors.pdf product at the Top of the computer desk features a detachable that... That provides ample Storage of important free Shipping to US 48 States Saddle Stool Instructions! Meeting computer desk assembly instructions Assembly Instructions, - Y13556, Y13557 - 300 Lbs product many... The Top of the shelves of the computer desk, Multiple Colors.pdf you!
Screw in the kick plates on the front-bottom of the computer desk. MS18-D1-1009-32 Canyon Walnut. Customer ratings by feature Leg room 4.8 For gaming 4.4 Sturdiness 4.4 Attach four Legs (B) to the apron corners of the Desk Top (A) with the end dowels fully inserted by using the 2 Bolts (1) with the Lock Washers (2) and Flat Washers (3) through the drilled holes on the corner blocks and securely screw into the threaded inserts on the Legs. WebLets get it a start and build an easy and straightforward computer desk to make it a good fit for both your office and home.
A pop-up will open with a link to Assembly & other documents. WebTo achieve an optimal sitting position the chair should be at a height that your feet are flat on the floor and your upper and lower legs are at a 90 degree angle. Y12354, Y12355, Y12356, Y12357, Y12358, Y12359, Y12360 - Solid Wood Conference Table with Industrial Legs Assembly Instructions, - Y12827, Y12828, Y12830, Y12831, Y12832, Y12833, Y12835, Y12836, Y12838, Y12839 - Mobile Industrial Steel Leg Conference Table Assembly Instructions, - Y12829, Y12834, Y12837 - Oval Mobile Industrial Steel Leg Conference Table Assembly Instructions, - Attach four Legs (B) to the apron corners of the Desk Top (A) with the end dowels fully inserted by using the 2 Bolts (1) with the Lock Washers (2) and Flat Washers (3) through the drilled holes on the corner blocks and securely screw into the threaded inserts on the Legs. 2 MB Download. Stand the desk upright and place it at your desired location. Do not fully tighten all bolts until all parts are in place. Scan the QR code with a smartphone or tablet to get 3D interactive instructions in the free BILT app. This 55 inch Realspace Axley glass computer desk features a detachable shelf that provides ample storage of important FREE Shipping to US 48 States. Customer ratings by feature Leg room 4.8 For gaming 4.4 Sturdiness 4.4
Refer to parts list. warranty and crafted with todays styles in mind 2.
 Step 3 Click Assembly & other documents to open tab. Download PDF assembly instructions for our sit-stand desks, office desks, office task chairs, and more. Our Mainstays 6 Cube Storage Computer Desk, Multiple Colors.pdf.
 Worry Free Service We provide lifetime customer service and Prompt response from SINPAID will always be here no matter before or after sales Assembly Instructions Important Carefully unpack and identify each component before attempting to assemble. If you misplaced your instructions, or if you just want to preview the assembly procedure for an item, please feel free to download, view, or print the instructions. The height of your elbow is the ideal height of your desk. WebSummary of Contents for BUSH FURNITURE 60W. Y11529 - White 120 Curved Glass Top Reception Desk Assembly Instructions, -
Assembly Instruction Step 1 Step 2 Please put the convex side up (Face the same direction as the legs), and flat side down.
How to fix the issue: Desk Board Do Not Align Applicable Model S-203/S-203B L Shaped Desk Applicable SKU: TS500004/TS500019 2.
Step 3 Step 4 Lay out the desk board on a clean soft cloth to prevent the desktop surface from being scratched. Capacity Antimicrobial Black Vinyl Guest Chair Assembly Instructions, - Y12971, Y12972 - Fabric/Antimicrobial Vinyl Guest Chair Assembly Instructions, - Y13013, Y13014 - 300 lb.
The product assembly instructions will be listed. ASSEMBLY INSTRUCTIONS STEP 18 Insert shelf supports (H) into any of the four sets of holes, according to desired height. MS17-D4-1011-03 . Capacity Split Seat Saddle Stool Assembly Instructions, - Y13556, Y13557 - 300 Lbs. Make sure the screw holes on Rear Rail(@) face up. Place middle shelf (8) on supports. All you need is a plywood sheet, steel pipe, miter saw, fence sheet, wood boards, wood glue, nail set, pocket screws, and paint.
Align and fix Rear Rail() with 4 holes and Front Rails(@) with 2 holse to the Table Top(CD) with screw(B) by Allen Key(D). Parsons . CubiCubi Desk Easy Assembly 2.0. TOPSKY Standing Desk DF02.01 WebFind Stand Up Desk Store Product Assembly Instructions here. Step 5 The desktop can only be fixed with silver screw K . Capacity Workhorse Multi-Function Office Chair Assembly Instructions, - Y12714 - Domino 2-Seat Gray Loveseat Assembly Instructions, - Y12715 - Domino 3-Seat Gray Sofa Assembly Instructions, - Y12716 - Domino 3-Seat Gray Sofa Assembly Instructions, - Y12717 - Domino 3-Piece Corner Gray Sofa Assembly Instructions, - Y12718 - Domino 5-Piece Corner Gray Sofa Assembly Instructions, - Y12719 - Domino Armless Gray Modular Seat Assembly Instructions, - Y12720 - Domino Corner Gray Modular Seat Assembly Instructions, - Y12721 - Domino/Revamp Series Pillow/Arm Bolster Assembly Instructions, - Y12722 - Domino Gray Cushioned Table/Bench Assembly Instructions, - Y12724 - Revamp 45 Degree Wedge Table Assembly Instructions, - Y12731, Y12732 - 300 lb. How to Install Furinno Drawer Slide. WebAssembly Instructions for some of our most popular office chairs, desks, reception desks, conference tables and other office furniture are provided below. If your item arrives damaged, scratched or missing part, please feel free to contact us, we will send you free replacement or offer a partial refund. How to Install Furinno Door Spring. Made the right choice for your home. This was helpful (135) share. Web Easy to Assemble Computer desk comes with included clear and detailed instructions, numbered parts, and a L shaped allen wrench for assembly.
How to Install Furinno Insert Cap (Turn-N-Tube Collection) How to Install Furinno Top Cap (Turn-N-Tube Collection) How to Install Furinno Cam Lock Nut. WebStep 1 Search for your product at the top of the page and go to your product's page. WebCOMPUTER DESK Step 1: Lay the Table Top(CD) upside down onto a clean smooth surface such as carpet or cardboard.
Models .
Made the right choice for your home. Adjustable Dumbbell Assembly Instructions, - Y13214 - 335-Pound Rubber Grip Weight Plate Set/Storage Rack Assembly Instructions, - Y13216 - The Beast Commercial Quality Power Rack with 1500 lbs. Multi-Shift Chair Assembly Instructions, - Y12597 - Leather & Mesh Color Burst Office Stool w/21"-28" Seat Height Assembly Instructions, - Y12598 - GeoFlex Ergonomic Office Stool w/23"-30" Seat Height Assembly Instructions, - Y12599 - Ergonomic Mesh Task Stool w/23"-30" Seat Height Assembly Instructions, - Y12600 - Ergonomic Mesh Back Ultra Office Stool w/21"-28" Seat Height Assembly Instructions, - Y12601 - RetroTasc Fabric Office Stool w/23"-30" Seat Height Assembly Instructions, - Y12614 - Advanced Ergonomic Ultra Office Stool w/25"-32" Seat Height Assembly Instructions, - Y12686 - 350 Lbs.
Easy installation in just 15 minutes. The metal construction ensures durability for long lasting use while the ample working space lets you keep important supplies close for easy accessibility.
bureau image by razorconcept from Fotolia.com. Capacity Assembly Instructions, - Y13217 - Complete Free Weight Fitness Set with The Beast Power Rack and Bench Assembly Instructions, - Y11760, Y11761, Y11762, Y11763, Y11764 and Y11765 - Desk Mount Privacy Panel Assembly Instructions, - Y11800, Y11812, Y13115 - Office Panels with Raceways Assembly Instructions, - Y11874, Y11875, Y11876, Y11877, Y11920, Y11921, Y11922, Y11923, Y13100, Y13101, Y13102, Y13103 - L-Shaped Cubicle Workstation Assembly Instructions, - Y11878, Y11879, Y11880, Y11881, Y11882, Y11883, Y11884, Y11885, Y11933, Y11934, Y11935, Y11936, Y11937, Y11938, Y11939, Y11940, Y13076, Y13077, Y13078, Y13079, Y13080, Y13081, Y13082, Y13083 - 36"W Carrel/Cubicle Assembly Instructions, - Y11886, Y11887, Y11888, Y11889, Y11890, Y11891, Y11892, Y11893, Y11941, Y11942, Y11943, Y11944, Y11945, Y11946, Y11947, Y11948, Y13084, Y13085, Y13086, Y13087, Y13088, Y13089, Y13090, Y13091 - 48"W Cubicle Assembly Instructions, - Y11894, Y11895, Y11896, Y11897, Y11898, Y11899, Y11900, Y11901, Y11949, Y11950, Y11951, Y11952, Y11953, Y11954, Y11955, Y11956, Y13092, Y13093, Y13094, Y13095, Y13096, Y13097, Y13098, Y13099 - 60"W Cubicle Assembly Instructions, - Y11902, Y11903, Y11924, Y11925, Y12610, Y12611, Y12612, Y12613 Y13110, Y13111, Y13112, Y13113 - 4-Person Cluster Office Cubicle Assembly Instructions, - Y12080, Y12086, Y13146, Y13152 - TrendSpaces Open End Cubicle Assembly Instructions, - Y12081, Y12087, Y13147, Y13153 - TrendSpaces 2-Person Straight Cubicle Assembly Instructions, - - Y12082, Y12088, Y13149, Y13155 - TrendSpaces L-Shaped Cubicle Assembly Instructions, - Y12083, Y12089, Y13150, Y13156 - TrendSpaces 2-Person L-Shaped Cubicle Assembly Instructions, - Y12084, Y12090, Y13148, Y13154 - TrendSpaces 4-Person Cluster Cubicle Assembly Instructions, - Y12085, Y12091, Y13151, Y13157 - TrendSpaces 4-Person L-Shaped Cubicle Assembly Instructions, - Y12267, Y12268, Y12269, Y12270, Y12271, Y12272, Y12273, Y12274, Y12275, Y12276, Y12277, Y12278, Y13104, Y13105, Y13106, Y13107, Y13108, Y13109 - 2-Person Cubicle Assembly Instructions, - Y12991, Y12992, Y13011, Y13012, Y13023, Y13026 - Premium 1/4" Thick Protective Acrylic Sneeze Guard Assembly Instructions, - Y12995, Y12996, Y12997, Y12998 - Countertop Shield w/Heavy Duty Metal Frame Assembly Instructions, - Y13015, Y13016, Y13017 - Portable Acrylic Sneeze Guard w/ 9" Side Wings Assembly Instructions, - Y13018 - 36"W x 31-1/2"H Portable Acrylic Sneeze Guard Assembly Instructions, - Y13027, Y13028, Y13029, Y13030, Y13031, Y13032, Y13033, Y13034, Y13035, Y13036 - ASSEMBLY INSTRUCTIONS STEP 18 Insert shelf supports (H) into any of the four sets of holes, according to desired height. Assembly Instructions.
While in this position, touch your collar bone and let your arm hang along your body.
Cap. CubiCubi Desk Easy Assembly 2.0; Sold Out. $59.99. If you misplaced your instructions, or if you just want to preview the assembly procedure for an item, please feel free to download, view, or print the instructions.
Saint Louis University News Student Death, Articles C